- Shrink a Document to One Page. Many times you are printing your document and the last page is mostly blank and there is no need for that last page if the page is mostly blank, right? Learn how to actually shrink a document by one page without using printer settings.
Word can try to reduce a document by reducing the size and spacing of the text in the document. It will adjust the fonts within the document to make it one page smaller. So if you have a 5 page document that needs to be 4 pages, just use the method described below.
1. Open a Word document or use our sample files.
- Word 2010 Users:
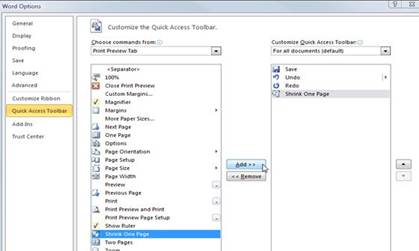
Add the Shrink to Fit button to the Quick Access Toolbar.
Click File > Options > Quick Access Toolbar.
In the Quick Access Toolbar dialog go to the Choose commands from drop-down menu, select Print Preview Tab.

Find the “Shrink One Page” option and click on the Add button.
Click OK to close the dialog box.

Now, in the Quick Access Toolbar, Click on the newly added Shrink One Page button.
- Word 2007 Users:
Click on the Office Button > Print > Print Preview.
In the Preview group, click on the Shrink to One Page button.

- Word 2003 Users:
Go to the File menu and select Print Preview.
In the Print Preview toolbar, click on the Shrink to Fit button.

2. That's it, after pressing this button, the document will be reduced by one page. You can press this button multiple times ... until the document has been reduced to a single page.
Note: Try practicing on both of our sample files to see the effect on different length documents.
|


